
This is Part 6 in the series: Linux on STM32MP135. See other articles.
This is a record of steps I took to successfully get Linux past the early boot stage on my custom board using the STM32MP135 SoC. (Schematics, PCB design files, and code available in this repository.) The write-up is in approximate chronological order, written as I go through the debugging steps.
I had previously put together a simple bare-metal program that runs on the STM32MP135 evaluation board and just blinks the LED. To work on the custom board, I needed only to remove anything to do with the STPMIC1 and LSE clock (the low-speed external 32.768 kHz clock), since I did not place these parts on my board. The resulting code is pretty simple modulo complexity inherited from the ST drivers.
To download the code, I talked directly to the ROM bootloader on the SoC. See this article for details.
Again, I had previously put together a simple program to test the DDR on the evaluation board. It fills the memory entirely with pseudorandom bits (PRBS-31), and then reads it out, checking that the data matches.
For the custom board, the program had to be modified similarly as with blink (remove STPMIC1, LSE clock) and then it ran. (Click for code.)
There was an issue: all data read back was wrong and subtly corrupted. I double checked the wiring, DDR parameter configuration (I use the same DDR as the eval board, so what could it be!?), the code—only to realize the board was not getting enough current on the 1.35V power supply. With more power, everything just worked!
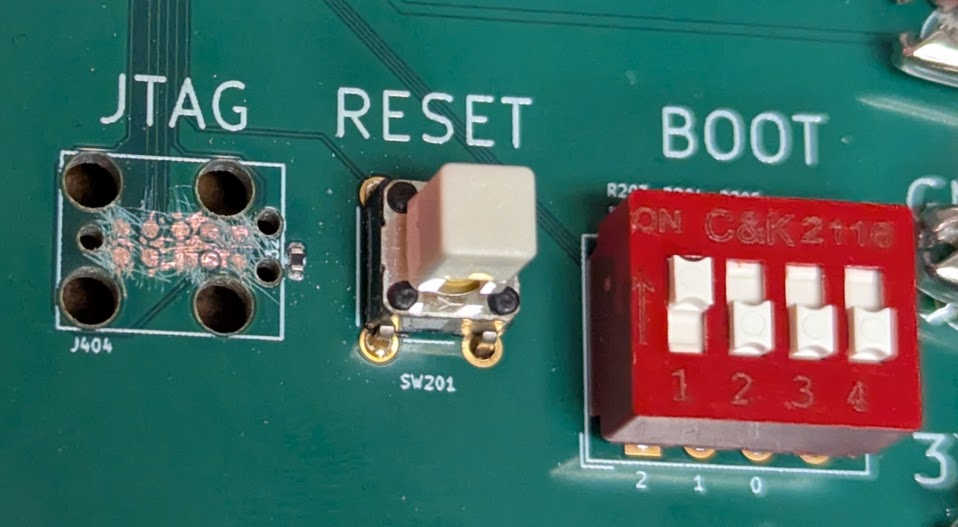
For JTAG loading it appears to be essential to select “Development boot” (also
called “Engineering boot”) by selecting the boot pins in the 100 setting. The
datasheet says this mode is used “Used to get debug access without boot from
flash memory”.
There is also a footnote that says that the core is “in infinite loop toggling
PA13”, but I did not observe the toggling in the “dev boot” mode, even though it
is of course present (but not documented) in the normal UART boot mode (pins =
000).
Unfortunately I covered the J-Link connector with solder mask. After trying to carefully scratch it off using a sewing needle, the connection appears to be intermittent. Sometimes J-Link was able to download the DDR test program to the SYSRAM, but most of the time it couldn’t. Probably it would work just fine if it wasn’t for the soldermask covering. I wish I had just used a normal pin-header connector rather than the J-Link needle adapter. So, I’ll have to use UART boot mode for now, and hope that I can get the (much faster) USB mode to work.
Note: read the full SD card story here.
On the STM32MP135 evaluation board, an SDMMC example reliably reads a program
from an SD card into DDR and executes it, but porting the same code to a custom
board exposed a failure during SD initialization. Although command-level
communication succeeded—CMD0, CMD8, CMD55, and ACMD41 all completed normally and
the card identified as SDHC—the sequence consistently failed later in
SD_SendSDStatus with SDMMC_FLAG_DTIMEOUT. Hardware checks showed that SD
card power, SDMMC I/O domain voltages, and signal levels all matched the
evaluation board, with clean 3.3 V logic and a low clock rate of about 1.56 MHz.
The decisive difference turned out to be signal pull-ups: the evaluation board
routes SD signals through an ESD device with built-in pull-ups, whereas the
custom board did not. Enabling internal pull-ups on the SD data lines eliminated
the data timeout and allowed SD reads to proceed, confirming that missing
pull-ups were responsible for the initialization failure.
However, once SD transfers succeeded, the data read from the card appeared corrupted in DDR: roughly every other byte was intermittently wrong, always off by exactly two, independent of bus width, clock edge, power supply, or signal integrity. The critical observation was that data read into a static buffer in SYSRAM was always correct, while corruption appeared only after copying that data into DDR using byte-wise writes such as memcpy. When DDR was written using explicit, 32-bit aligned word accesses, the corruption disappeared entirely. Ensuring that all DDR writes are word-sized and properly aligned provided a full workaround for the issue and restored correct, reproducible SD card operation on the Rev A custom board. (The issue is likely due to a mask/strobe swap in the DDR wiring; see this for details.)
Note: read the full USB story here.
Getting USB working on a custom STM32MP135 board involved a few key hardware and software steps. First, I enabled the USBHS power switch by adding a current-limit resistor so the PHY would receive power. On the board, I removed the permanent 1.5 kΩ pullup on the D+ line to allow proper High-Speed enumeration. I also ensured JTAG worked reliably by booting in engineering debug mode and verifying the vector table took interrupts in ARM mode.
On the software side, I disabled VBUS sensing in the HAL PCD initialization to
match the externally powered board, configured the Rx/Tx FIFOs, and made sure
all required USB interrupts were correctly handled. For the USB Device stack, I
added the necessary callbacks in usbd_conf.c and applied volatile casts to
ensure 32-bit accesses to SYSRAM were aligned, avoiding Data Aborts.
Finally, I verified proper memory alignment for DDR writes to ensure file transfers worked without byte shuffling, and confirmed enumeration and data transfers at High-Speed using a good USB cable and port. After these steps, the board enumerated correctly as an MSC device, and read/write operations functioned reliably.
Note: read the full TrustZone story here.
The STM32MP135 integrates the Arm TrustZone extension which partitions the
system into two isolated security domains, the secure and non-secure worlds,
depending on the state of the NS bit in the SCR register. Before the bit is
flipped, we need to unsecure many parts of the SoC (DDR, DMA masters, etc).
Since Linux is just another program, why not try and run it, now that we have disabled most secure-world hindrances? One thing to keep in mind is to respect the link address:
buildroot]> readelf -h output/build/linux-custom/vmlinux | grep Entry
  Entry point address:               0xc0008000
Let’s copy the binary instructions from the ELF file into something we can load into memory:
arm-none-eabi-objcopy -O binary \
    output/build/linux-custom/vmlinux \
    output/images/vmlinux.bin
Now we place the binary file in the same SD card image as the bootloader:
$ python3 scripts/sdimage.py build/sdcard.img build/main.stm32 build/vmlinux.bin

File                      LBA      Size       Blocks
-------------------------------------------------------
main.stm32                128      100352     197
vmlinux.bin               324      19111936   37329
Load the ~40,000 blocks from logical block address (LBA) 324 into DDR to
location 0xC0008000, and jump to it. If we follow along with the debug probe,
we see that the kernel begins executing in arch/arm/kernel/head.S and gets
stuck when it realizes that we did not pass it the correct boot parameters.
Let’s start with the default DTB and decompile it into the DTS:
[buildroot]> dtc -I dtb -O dts -@ \
   output/build/linux-custom/arch/arm/boot/dts/stm32mp135f-dk.dtb > \
   ~/temp/build/min.dts
Now remove as much of the unnecessary peripherals from the device tree and compile back into a DTB:
dtc -I dts -O dtb min.dts > min.dtbNext, we need to include this DTB in the SD card image:
$ python3 scripts/sdimage.py build/sdcard.img build/main.stm32 \
    build/vmlinux.bin build/min.dtb

File                      LBA      Size       Blocks
-------------------------------------------------------
main.stm32                128      100352     197
vmlinux.bin               324      19111936   37329
min.dtb                   37652    53248      105
Write the new image to the SD card, and boot the bootloader, and copy the kernel and the DTB to DDR:
> l 40000 324 0xc0008000
Copying 40000 blocks from LBA 324 to DDR addr 0xC0008000 ...
> l 105 37652 0xc2008000
Copying 105 blocks from LBA 37652 to DDR addr 0xC2008000 ...
> p 256 0xc2008000
0x00000000 : d0 0d fe ed  00 00 ce 12  00 00 00 38  00 00 bc c4  ...........8....
0x00000010 : 00 00 00 28  00 00 00 11  00 00 00 10  00 00 00 00  ...(............
0x00000020 : 00 00 11 4e  00 00 bc 8c  00 00 00 00  00 00 00 00  ...N............
0x00000030 : 00 00 00 00  00 00 00 00  00 00 00 01  00 00 00 00  ................
0x00000040 : 00 00 00 03  00 00 00 04  00 00 00 00  00 00 00 01  ................
0x00000050 : 00 00 00 03  00 00 00 04  00 00 00 0f  00 00 00 01  ................
0x00000060 : 00 00 00 03  00 00 00 32  00 00 00 1b  53 54 4d 69  .......2....STMi
0x00000070 : 63 72 6f 65  6c 65 63 74  72 6f 6e 69  63 73 20 53  croelectronics S
We can match the print against the DTB hexdump to verify that it’s been written
correctly (note the “d00dfeed” at the start of the DTB). Then issue the j or
jump instruction, and follow along with the debugger:
gdb)
69         push  {r4} // CPSR after return
(gdb) del
(gdb) si
sm_smc_entry () at src/handoff.S:70
70         push  {r3} // PC after return
(gdb)
sm_smc_entry () at src/handoff.S:71
71         rfefd sp
(gdb)
0xc0008000 in ?? ()
(gdb) file build/vmlinux
Reading symbols from build/vmlinux...
(gdb) si
__hyp_stub_install () at arch/arm/kernel/hyp-stub.S:73
73      arch/arm/kernel/hyp-stub.S: No such file or directory.
(gdb) directory build/linux-custom
Source directories searched: build/linux-custom;$cdir;$cwd
(gdb) si
0xc01149a4      73              store_primary_cpu_mode  r4, r5
Above we see the last three instructions from the bootloader, and then we need
to switch GDB to the Linux kernel executable, and provide it the source code
directory. Then, we see one of the first instructions from the kernel being
executed, on line 73 of hyp-stub.S.
Step instruction (si) a couple times until we reach the branch to
__vet_atags. That routine is responsible to determine the validity of the r2
pointer that the bootloader is supposed to point to where we copied the DTB in
the memory. Let’s see what happens:
__vet_atags () at arch/arm/kernel/head-common.S:44
44              tst     r2, #0x3                        @ aligned?
45              bne     1f
47              ldr     r5, [r2, #0]
49              ldr     r6, =OF_DT_MAGIC                @ is it a DTB?
50              cmp     r5, r6
51              beq     2f
61      2:      ret     lr                              @ atag/dtb pointer is ok
Evidently the DTB pointer is good! Now we return back to the startup code and
proceed with enabling MMU, clearing memory, etc. I got tired of single-stepping
through memset and hit continue, and was amazed to find the following on the
serial monitor:
[    0.000000] Booting Linux on physical CPU 0x0
[    0.000000] Linux version 6.1.28 (jk@SRS1720) (arm-buildroot-linux-uclibcgnueabihf-gcc.br_real (Buildroot 2024.11-202-g3645e3b781-dirty) 13.3.0, GNU ld (GNU Binutils) 2.42) #1 SMP PREEMPT Thu Dec 18 17:02:40 PST 2025
[    0.000000] CPU: ARMv7 Processor [410fc075] revision 5 (ARMv7), cr=10c5387d
[    0.000000] CPU: div instructions available: patching division code
[    0.000000] CPU: PIPT / VIPT nonaliasing data cache, VIPT aliasing instruction cache
[    0.000000] OF: fdt: Machine model: STMicroelectronics STM32MP135F-DK Discovery Board
[    0.000000] Memory policy: Data cache writealloc
[    0.000000] cma: Reserved 64 MiB at 0xdc000000
[    0.000000] Zone ranges:
[    0.000000]   Normal   [mem 0x00000000c0000000-0x00000000dfffffff]
[    0.000000]   HighMem  empty
[    0.000000] Movable zone start for each node
[    0.000000] Early memory node ranges
[    0.000000]   node   0: [mem 0x00000000c0000000-0x00000000dfffffff]
[    0.000000] Initmem setup node 0 [mem 0x00000000c0000000-0x00000000dfffffff]
In other words: IT WORKS!!!
There’s an important step that had to take place before the “blink” example could run on the custom board: let go of the sheer excitement. Having worked on or with some kind of a Linux system for perhaps two decades, it was an almost surreal, mystical feeling to hold in my hands a board that I designed myself that is supposed to run the operating system. It’s what makes engineering a rewarding experience, but the mental jitter of it can also interfere with getting things done. After all, this is just routine work!

The STM32MP135 integrates the Arm TrustZone extension which partitions the
system into two isolated security domains, the secure and non-secure worlds,
depending on the state of the NS bit. On reset, it executes in the secure
world (NS=0), but in normal operation, we want NS=1.
In this article, we explain how to execute the world transitions in a bare-metal environment. See this article to learn how to do it in the context of Arm Trusted Firmware (TF-A) and Linux.
The NS bit is only supposed to be flipped in the Secure Monitor handler,
invoked with the smc instruction. Thus a minimum handler might look as follows
(assumes the return address is passed in via r3):
.align 2
sm_smc_entry:
   mrc p15, 0, r0, c1, c1, 0 // read SCR
   orr r0, r0, #SCR_NS
   mcr p15, 0, r0, c1, c1, 0 // write SCR
   mov r0, #0

   mov r4, #(CPSR_MODE_SVC | CPSR_I | CPSR_F)
   push  {r4} // CPSR after return
   push  {r3} // PC after return
   rfefd sp
We see that the NS bit lives in the SCR register, and that there is a
special syntax to access that register. To exit from the SMC handler, we push
the desired exception state (SVC mode with IRQ and FIQ disabled) on the stack
together with the return address, and then exit with rfefd sp.
Before we can call smc, we should create the exception table. If the SMC is
the only exception we care about, a minimal table might look as follows:
.align 5
sm_vect_table:
   b .            // Reset
   b .            // Undefined instruction
   b sm_smc_entry // Secure monitor call
   b .            // Prefetch abort
   b .            // Data abort
   b .            // Reserved
   b .            // IRQ
   b .            // FIQ
Then, sometime before calling smc, install it in the MVBAR register as
follows:
ldr r0, =sm_vect_table
mcr p15, 0, r0, c12, c0, 1 // MVBARThe system and peripherals must be set up with access allowed from the
non-secure world before we flip the NS bit, otherwise the system will just
freeze. Here’s a list of things that must be unsecured before the flip:
DDR unsecured via the TZC-400 firewall
GIC distributor and CPU interface
ETZPC = Embedded TrustZone Protection Controller
Clock and reset control (RCC)
Pin controller / all GPIO banks
In the following sections, we will examine these one by one, showing how to unsecure then and how to verify they have been unsecured.
Let’s configure the TZC to allow DDR Region0 R/W non-secure access for all
IDs. While we can use the TZC to partition the RAM into several regions, we will
use Region0 only which is always enabled. (The region implicitly covers the
entire address space.)
TZC->GATE_KEEPER = 0;
TZC->REG_ID_ACCESSO = 0xFFFFFFFF;
TZC->REG_ATTRIBUTESO = 0xC0000001;
TZC->GATE_KEEPER |= 1U;
First, the “gate keeper” is disabled so that we can modify the configuration. Then, we set the access bits to all ones, so that that each NSAID gets both write and read permission. Next, we set the attributes so that secure global write and read are enabled, and the filter is enabled for the region. Finally, we “close” the gate keeper so that the configuration is active.
To verify that the configuration worked, we print out all the fields from the
TZC struct defined in the CMSIS Device Peripheral Access Layer Header File
(stm32mp135fxx_ca7.h):
[TZC dump] begin
  BUILD_CONFIG     = 0x00001F08
  ACTION           = 0x00000000
  GATE_KEEPER      = 0x00010001
  SPECULATION_CTRL = 0x00000000
  REG_BASE_LOWO    = 0x00000000
  REG_BASE_HIGHO   = 0x00000000
  REG_TOP_LOWO     = 0xFFFFFFFF
  REG_TOP_HIGHO    = 0x00000000
  REG_ATTRIBUTESO  = 0xC0000001
  REG_ID_ACCESSO   = 0xFFFFFFFF
[TZC dump] end
Of course, we will not be able to verify that the configuration actually works till we unsecure everything else on the list. Then, we will switch the CPU to nonsecure world and verify that read and write from DDR succeeds.
The Generic Interrupt Controller is split into two parts: the Distributor (GICD) takes care of the global IRQ configuration, while the CPU interface (GICC) does the per-CPU IRQ delivery. In TrustZone, there are two interrupt groups:
Group 0 corresponds to the Secure world
Group 1 corresponds to the Non-Secure world
Now we go step by step, enabling non-secure access to/from interrupts. First we configure the interrupts themselves as non-secure:
Allow both Group 0 and 1 interrupts to be forwarded from the GICD to the CPU
interfaces. The GICD control register (GICD_CTLR) is included in the CMSIS
file core_ca.h in the GICDistributor_Type struct:
GICDistributor->CTLR = 0x03U;Just before switching to non-secure world, we will disable all interrupts, mark them as non-pending, and move to Group 1 (non-secure):
const int num_reg = 5;
for (uint32_t n = 0; n <= num_reg; n++) {
  GICDistributor->ICENABLER[n] = 0xffffffff;
  GICDistributor->ICPENDR[n]   = 0xffffffff;
  GICDistributor->IGROUPR[n]   = 0xffffffff;
}In the CPU interface control register, enable Group 1 signaling:
GICInterface->CTLR |= 0x03U;Priority masking: allow all priority levels to pass through:
GICInterface->PMR = 0xFFU;Now we can dump all the GICC registers after handoff:
[GICC dump] begin
  CTLR    = 0x00000003
  PMR     = 0x000000F8
  BPR     = 0x00000002
  IAR     = 0x000003FF
  EOIR    = 0x00000000
  RPR     = 0x000000FF
  HPPIR   = 0x000003FF
  ABPR    = 0x00000003
  AIAR    = 0x000003FF
  AEOIR   = 0x00000000
  AHPPIR  = 0x000003FF
  STATUSR = 0x00000000
  APR[0]   = 0x00000000
  APR[1]   = 0x00000000
  APR[2]   = 0x00000000
  APR[3]   = 0x00000000
  NSAPR[0] = 0x00000000
  NSAPR[1] = 0x00000000
  NSAPR[2] = 0x00000000
  NSAPR[3] = 0x00000000
  IIDR    = 0x0102143B
  DIR     = 0x00000000
[GICC dump] end
This means:
CTLR enables Group 0 and 1 interrupts
PMR sets PRIORITY[4:0] = 0b11111, which allows all non-secure interrupts
to be signaled
BPR controls how the 8-bit interrupt priority field is split into a group
priority field
IAR shows CPUID = 0, and INTERRUPT_ID = 1023, which indicates a
“Spurious interrupt ID” (no pending interrupt at the CPU interface)
EOIR: CPUID = 0, end-of-interrupt ID = 0, i.e. no interrupt being
completed
RPR: PRIORITY[4:0] = 0b11111, current running priority on the CPU
interface indicates no active interrupt
Now we open access to all peripherals protected by ETZPC. Luckily the ST HAL includes a function to open the entire ETZPC to non-secure access:
__HAL_RCC_ETZPC_CLK_ENABLE();

// unsecure SYSRAM
LL_ETZPC_SetSecureSysRamSize(ETZPC, 0);

// unsecure peripherals
LL_ETZPC_Set_All_PeriphProtection(ETZPC,
     LL_ETZPC_PERIPH_PROTECTION_READ_WRITE_NONSECURE);
Let’s print out the ETZPC registers after running this:
[ETZPC dump] begin
  TZMA0_SIZE       = 0x8000000D
  TZMA1_SIZE       = 0x00000000
  DECPROT0         = 0xFFFFFFFF
  DECPROT1         = 0xFFFFFFFF
  DECPROT2         = 0xFFFFFFFF
  DECPROT3         = 0xFFFFFFFF
  DECPROT4         = 0x00000000
  DECPROT5         = 0x00000000
  DECPROT_LOCK0    = 0x00000000
  DECPROT_LOCK1    = 0x00000000
  DECPROT_LOCK2    = 0x00000000
  HWCFGR           = 0x00004002
  IP_VER           = 0x00000020
  ID               = 0x00100061
  SID              = 0xA3C5DD01
[ETZPC dump] end
This means that SYSRAM and ETZPC are fully non-secure.
Through the RCC secure configuration register (RCC_SECCFGR), we may configure
various clocks to be either secure or non-secure. Easy enough to unsecure:
RCC->SECCFGR = 0x00000000;Likewise, after enabling the GPIOs, we need to allow non-secure access to them:
GPIOA->SECCFGR = 0x00000000;
GPIOB->SECCFGR = 0x00000000;
GPIOC->SECCFGR = 0x00000000;
GPIOD->SECCFGR = 0x00000000;
GPIOE->SECCFGR = 0x00000000;
GPIOF->SECCFGR = 0x00000000;
GPIOG->SECCFGR = 0x00000000;
GPIOH->SECCFGR = 0x00000000;With the steps above done, a program will run in the non-secure world (NS=1).
However, most of the diagnostics to get there will probe secure-only registers,
such as those used by the TZC, which will result in an immediate undefined
instruction or similar abort.
In other words, in non-secure world, you are limited to non-secure things!

This article presents my step-by-step debug process for getting the SD card to work reliably on my custom board integrating the STM32MP135.
For the evaluation board, I prepared a simple example that reads a program (blink) from SD card to DDR, and passes control to the program. The LED blinks, everything is fine.
On the custom board, I simplified the example so it just tests that DDR and SD
card can be written to and read from. The SD initialization fails as follows.
In file stm32mp13xx_hal_sd.c, the function HAL_SD_Init calls
HAL_SD_GetCardStatus which calls SD_SendSDStatus. There, the error flag
SDMMC_FLAG_DTIMEOUT is detected, i.e. timeout when trying to get data.
The custom board connections from MCU to SD card pins are as follows:
PC10/SDMMC1_D2 (B13) → 1 DAT2
PC11/SDMMC1_D3 (C14) → 2 DAT3/CD
PD2/SDMMC1_CMD (A15) → 3 CMD with 10k pullup to +3.3V
+3.3V → 4 VDD
PC12/SDMMC1_CK (B15) → 5 CLK
GND → 6 VSS
PC8/SDMMC_D0 (D14) → 7 DAT0
PC9/SDMMC_D1 (A16) → 8 DAT1
PI7 (U16) uSD_DETECT → 9 DET_B with 100K pullup to +3.3V
(nc) → 10 DET_A
Since the failure happens soon after switching the card into 1.8V mode, I need
to verify the voltages. On the evaluation board, VDD_SD is 3.3V on boot, and
when the SD program is running, it lowers it to 2.9V. I modified the code to
leave it at 3.3V, and it worked also: the code read data from SD card correctly.
On my custom board, VDD_SD is tied to 3.3V directly. (SD cards should accept
abything from 2.7V to 3.6V.) Thus, the SD card voltage should be okay.
The other voltage to check is the one powering the SoC domain for the SDMMC
controller. The eval board shows that both VDDSD1 and VDDSD2 are tied to
VDD—the same VDD as the rest of the SoC. We can measure that easily via
CN14 pin 13, and it measures 3.3V. On the custom board, these are tied to 3.3V
directly.
On the eval board, I looked at the SDMMC1_CK line (about 1.56 MHz),
SDMMC1_CMD, and the data lines with a scope probe and I saw 3V logic signals,
so it does not seem that 1.8V logic is used.
Adding lots of print statements to SD_PowerON, we get the following when
running on the custom board:
CMD0: Go Idle State...
CMD0 result = 0x00000000
CMD8: Send Interface Condition...
CMD8 result = 0x00000000
CMD8 OK -> CardVersion = V2.x
CMD55: APP_CMD (arg=0)
CMD55 result = 0x00000000
ACMD41 loop...
Loop 0
  CMD55...
  CMD55 result = 0x00000000
  ACMD41...
  ACMD41 result = 0x00000000
  R3 Response = 0x41FF8000
  ValidVoltage = 0
Loop 1
  CMD55...
  CMD55 result = 0x00000000
  ACMD41...
  ACMD41 result = 0x00000000
  R3 Response = 0xC1FF8000
  ValidVoltage = 1
ACMD41 success: OCR=0xC1FF8000
Card reports High Capacity (SDHC/SDXC)
SD_PowerON: SUCCESS
Followed by the same HAL_SD_ERROR_DATA_TIMEOUT error from SD_SendSDStatus.
Let’s instrument the latter function with prints also. Here’s what we get:
--- SD_SendSDStatus BEGIN ---
Initial RESP1 = 0x00000900
CMD16: Set Block Length = 64...
CMD16 result = 0x00000000
CMD55: APP_CMD (arg=RCA<<16) = 0xAAAA0000
CMD55 result = 0x00000000
Configuring DPSM: len=64, block=64B
ACMD13: Send SD Status...
ACMD13 result = 0x00000000
Waiting for data...
ERROR: SDMMC_FLAG_DTIMEOUT detected!The SD card initialization was inherited from the evaluation board, where
all the signals are passed through the EMIF06-MSD02N16 ESD protection chip,
which also features built-in pullups.
In HAL_SD_MspInit, we can enable internal pullups on the data lines going to
the SD card. In that case, we get the following printout from the instrumented
version of SD_SendSDStatus:
--- SD_SendSDStatus BEGIN ---
Initial RESP1 = 0x00000900
CMD16: Set Block Length = 64...
CMD16 result = 0x00000000
CMD55: APP_CMD (arg=RCA<<16) = 0xAAAA0000
CMD55 result = 0x00000000
Configuring DPSM: len=64, block=64B
ACMD13: Send SD Status...
ACMD13 result = 0x00000000
Waiting for data...
RXFIFOHF set — reading 8 words...
  FIFO -> 0x00000000
  FIFO -> 0x00000004
  FIFO -> 0x00900004
  FIFO -> 0x001A050F
  FIFO -> 0x00000000
  FIFO -> 0x00000100
  FIFO -> 0x00000000
  FIFO -> 0x00000000
RXFIFOHF set — reading 8 words...
  FIFO -> 0x00000000
  FIFO -> 0x00000000
  FIFO -> 0x00000000
  FIFO -> 0x00000000
  FIFO -> 0x00000000
  FIFO -> 0x00000000
  FIFO -> 0x00000000
  FIFO -> 0x00000000
Data-end flag set, reading remaining FIFO...
Clearing static DATA flags
--- SD_SendSDStatus SUCCESS ---
After that, reading from the SD card was possible—but about half of the bytes read were slightly corrupted.
Suspecting that there is something wrong with the 4-bit data transfers, I
switched to SDMMC_BUS_WIDE_1B and confirmed with a scope probe that there is
no data on DAT1,2,3, only on DAT0. But data corruption is still there. The clock
speed is only about 1.56 MHz, which seems to rule out signal integrity issues.
I tried a different power supply for the 3.3V supply, and still the same issue. I added 330uF capacitors on all three power rails (1.25V, 1.35V, 3.3V, althought 1.25V and 1.35V are connected together), and still no improvement. (The PCB already has a 10U capacitor next to the SD card VDD pin.)
Changing the ClockEdge of the SDHandle.Init does not fix it. Nor did setting
PIO_Init_Structure.Speed to GPIO_SPEED_FREQ_VERY_HIGH.
Interestingly the corruption affects only every other byte, and if it is corrupted, it’s always just off by 2 (i.e., only bit number 1 is affected).
Adding the external 3.3V 10k pullup on DAT0 (when running in SDMMC_BUS_WIDE_1B
mode) did not fix the corruption either. At any rate, scope traces show very
clean data and clock waveforms (as is to be expected at such a low frequency).
The test function used HAL_SD_ReadBlocks to write directly into DRAM. If
instead I wrote to a static buffer in SYSRAM, it works just fine.
So reading data from the SD card into a static buffer worked perfectly, but copying that data into DRAM using a byte-wise method like memcpy caused intermittent corruption. Only every other byte was sometimes wrong, always off by exactly 2, and the pattern varied with each read. This behavior was not reproducible when filling DRAM directly with aligned 32-bit word writes, which always produced correct data.
The root cause is that the DDR wiring swapped upper and lower data bytes in a way that only causes problems with non-32-bit data access. (The debugging process that led to that insight is explained in a future article.) The SD read itself was not at fault; the static buffer contained the correct bytes.
The workaround was to copy the SD block into DRAM using explicit 32-bit aligned word writes, constructing each word from four bytes of the static buffer. This ensures all writes are properly aligned and word-sized, eliminating the intermittent errors and producing fully correct, reproducible data in DRAM.

Tunnel vision is a big problem in the design process. It takes the form of overly optimizing one particular parameter of a system, which takes the whole into a local optimum, takes a long time, and inhibits the completion of a project—sometimes forever.
The way out is to recognize it happening and consciously accept imperfection as a Good Thing, for the best is the enemy of the good. This can mean accepting resource underutilization, visual imbalance, or even performance tradeoffs.
Nature is robust, omnipresent, and not at all perfect. Imitate nature.

Getting USB up and running in bare-metal mode using the ST HAL drivers on my custom STM32MP135 board took a couple attempts. After a few false starts with the example projects, I was able to make the board enumerate correctly, handle data transfers, and even read and write files reliably. In this article, I’ll walk through the hardware tweaks, HAL configuration, and debugging steps that helped me turn a stubborn USB interface into a fully working USB Mass Storage device.
I gave up trying to make the provided CDC_Standalone example from
STM32Cube_FW_MP13_V1.2.0
to work on the eval board, let alone the custom board. Instead, let’s get USB to
work step by step.
First, the VDD3V3_USBHS must not be powered on when VDDA1V8_REG is not
present. For that, we have the switch U201 (NCP380), but the board unfortunately
uses the adjustable-current version of the switch w/o the adjustment resistor
present, so the USBHS circuitry is disabled. So we first have to solder a
resistor (I had 39k + 10k at hand) to enable power to the USB circuit.
With that fix, if I reset the device with BOOT=000 (so PA13 LED blinks), then
plug the USB cable, then the LED stops blinking and the device manager shows
DFU in FS Mode @Device ID /0x501, @Revision ID /0x1003 as it should—so the
hardware works, we just need to fix the code. (Without the added resistor,
Windows was not able to enumerate the device and the Device Manager shows it as
Unknown USB Device (Device Descriptor Request Failed).)
In the main() function, I blink LED and print “:” on UART4 every second after
starting the USB using MX_USB_OTG_HS_PCD_Init() and HAL_PCD_Start();
functions. If I load the code with the USB cable plugged in, the “:” signs get
printed every second as they should, and also the LED blinks. If I unplug the
USB cable, then the printing and blinking stops—the code appears locked up.
The code also locks up if I select “Disable device” in Windows Device Manager.
If I load the code with USB cable not plugged in, only the first “:” gets
printed and then the code locks up.
Before the main loop we also see that OTG_GCCFG: 0x00000000, which means that
both of the following are disabled:
IDEN: USB ID detection enable
VBDEN: USB VBUS detection enable
Note that the hardware has a permanent 1.5K pullup (up to +3.3V) on D+, so the
USB driver does not need VBUS sensing. (The board is externally powered, so
removing the cable would not unpower the core or the USB PHY.) We explicitly
disable sensing VBUS in MX_USB_OTG_HS_PCD_Init(), where we create the
structure passed to HAL_PCD_Init() with the following line:
hpcd_USB_OTG_HS.Init.vbus_sensing_enable = DISABLE;With that request, the driver function USB_DevInit() clears the enable for
VBUS sensing in the GCCFG register:
if (cfg.vbus_sensing_enable == 0U)
{
USBx_DEVICE->DCTL |= USB_OTG_DCTL_SDIS;

/* Deactivate VBUS Sensing B */
USBx->GCCFG &= ~USB_OTG_GCCFG_VBDEN;

/* B-peripheral session valid override enable */
USBx->GOTGCTL |= USB_OTG_GOTGCTL_BVALOEN;
USBx->GOTGCTL |= USB_OTG_GOTGCTL_BVALOVAL;
}I checked that the USB interrupt service routine (HAL_PCD_IRQHandler()) is
linked by locating it in the map file (and not in the “Discarded input
sections”!). Just before the main loop, we print OTG_GAHBCFG: 0x00000001,
showing that OTG USB interrupts are unmasked, and OTG_GINTMSK: 0x803C3810,
which means the following interrupts are enabled:
Bit 4: RXFLVLM: Receive FIFO non-empty mask
Bit 11: USBSUSPM: USB suspend mask
Bit 12: USBRST: USB reset mask
Bit 13: ENUMDNEM: Enumeration done mask
Bit 18: IEPINT: IN endpoints interrupt mask
Bit 19: OEPINT: OUT endpoints interrupt mask
Bit 20: IISOIXFRM: Incomplete isochronous IN transfer mask
Bit 21: IISOOXFRM: Incomplete isochronous OUT transfer mask
Bit 31: WUIM: Resume/remote wake-up detected interrupt mask
If we IRQ_Disable(OTG_IRQn) before the main loop, than “Disable device” and
“Enable device” do not cause the core lockup. So, we just need to find out which
of the OTG USB interrupts exactly are not correctly handled, one by one.
If we enable just USBSUSPM, the locked happens. If we allow all the interrupts
that HAL enables, and then disable USBSUSPM, the lockup does not happen.
If we enable USBRST only, lockup does not happen. If we in addition add
ENUMDNEM, still no lockup. Add IEPINT, no lockup. Add OEPINT, no lockup.
Add IISOIXFRM, PXFRM_IISOOXFRM, and WUIM: no lockup.
If USBRST is the only enabled OTG interrupt, then the code locks up if the
cable is not plugged in when it starts executing, but it does not lock up if the
cable is present when it starts executing and is then unplugged.
If USBSUSPM is the only enabled OTG interrupt, then the code locks up both if
the cable is not present initially, or if it is unplugged later.
Meanwhile I figured out how to get the JTAG to work mostly reliably. First,
remember to boot with BOOT=100, the “Engineering debug mode”, otherwise the
JTAG is disabled. Then, the procedure is
Turn the 1.35V supply off and on again.
Press the reset button on the PCB.
Open JLinkGDBServer.exe
Call arm-none-eabi-gdb -q -x load.gdb
The load.gdb file is as follows:
set confirm off
set pagination off
file build/main.elf
target remote localhost:2330
monitor reset
monitor flash device=STM32MP135F
load build/main.elf
monitor go
break main
step
Loaded with the debugger, the program runs as before, and once USB “Disable device” is clicked from the Windows Device Manager, the following appears on the debugger after pressing Ctrl-C:
Program received signal SIGTRAP, Trace/breakpoint trap.
0x2ffe0104 in Vectors () at drivers/startup_stm32mp135fxx_ca7.c:444
444       __asm__ volatile(
(gdb) bt
#0  0x2ffe0104 in Vectors () at drivers/startup_stm32mp135fxx_ca7.c:444
Backtrace stopped: previous frame identical to this frame (corrupt stack?)
(gdb)
Searching the forums, I found a
post
where user bsvi discovered that startup_stm32mp135fxx_ca7.c take interrupts to
thumb mode in the Reset_Handler():
/* Set TE bit to take exceptions in Thumb mode */
"ORR R0, R0, #(0x1 << 30) \n"
If the vector table is aligned and encoded as ARM mode, the of course it cannot
work. Adding -mthumb and the interrupt immediately fired as was able to
confirm via a flashing LED at the top of the HAL_PCD_IRQHandler(). Stopping
the debugger there (Ctrl-C) confirmed that the code was executing there.
Better yet, we can remove the -mthumb and simply take interrupts to ARM mode:
/* TE = 0, exceptions enter ARM mode */
"BIC R0, R0, #(1 << 30) \n"
I changed the debug code at the top of HAL_PCD_IRQHandler() to just a print
statement, and it prints any time the USB cable is plugged in and out. Great!
Now that USB interrupts are no longer freezing the whole system, we can begin work on integrating the ST USB Device “middleware”. The initialization proceeds as the following approximate sequence of function calls:
MX_USB_Device_Init (usb_device.c)
   USBD_Init (usbd_core.c)
      USBD_LL_Init (usb_conf.c)
         HAL_PCD_Init (usbd_conf.c)
         HAL_PCDEx_SetRxFiFo (stm32mp13xx_hal_pcd_ex.c)
         HAL_PCDEx_SetTxFiFo (stm32mp13xx_hal_pcd_ex.c)
   USBD_RegisterClass (usbd_core.c)
   USBD_CDC_RegisterInterface (usbd_cdc.c)
   USBD_Start (usbd_core.c)
      USBD_LL_Start (usbd_conf.c)
         HAL_PCD_Start (stm32mp13xx_hal_pcd.c)
            USB_DevConnect (stm32mp13xx_ll_usb.c)
         USBD_Get_USB_Status (usbd_conf.c)
The example above is for a CDC-class application, but here we’re interested in a mass-storage class device (MSC). The USB files divide into four types:
HAL drivers: stm32mp13xx_ll_usb.c, stm32mp13xx_hal_pcd.c,
stm32mp13xx_hal_pcd_ex.c
USB device core: usbd_core.c, usbd_ctlreq.h, usbd_ioreq.c
USB class: usbd_msc.c, usbd_msc_bot.c, usbd_msc_data.c,
usbd_msc_scsi.c
app-specific: usb_device.c, usbd_conf.c, usbd_desc.c, usbd_msc_storage.c
An example of how the ST drivers are used for MSC class is provided in this repository.
For testing, we call the following from the main function:
USBD_Init(&USBD_Device, &MSC_Desc, 0);
USBD_RegisterClass(&USBD_Device, USBD_MSC_CLASS);
USBD_MSC_RegisterStorage(&USBD_Device, &USBD_MSC_fops);
USBD_Start(&USBD_Device);
The functions complete, and then the main loop is active, blinking LED and
printing to UART. The debug print in HAL_PCD_IRQHandler shows that the IRQ is
called a couple times, but after a few seconds, the Windows Device Manager shows
Unknown USB Device (Device Descriptor Request Failed).
As it turns out, I have forgotten to add the callbacks into usbd_conf.c. Once
that was done, the USB access from the Windows computer caused an immediate Data
Abort on the STM32MP135.
The aborts happen in usbd_msc_scsi.c in lines such as the following:
hmsc->scsi_blk_addr =
    ((uint32_t)params[2] << 24) |
    ((uint32_t)params[3] << 16) |
    ((uint32_t)params[4] << 8) |
    (uint32_t)params[5];

hmsc->scsi_blk_len =
    ((uint32_t)params[7] << 8) |
    (uint32_t)params[8];
As it happens, with some optimizations (I’m using -Os to make the whole
program fit in SYSRAM!) the compiler optimizes the byte access into a misaligned
32-bit access. Forcing a volatile cast fixes the problem, as follows:
hmsc->scsi_blk_addr =
    (((uint32_t)((volatile uint8_t*)params)[2]) << 24) |
    (((uint32_t)((volatile uint8_t*)params)[3]) << 16) |
    (((uint32_t)((volatile uint8_t*)params)[4]) <<  8) |
    ((uint32_t)((volatile uint8_t*)params)[5]);

hmsc->scsi_blk_len =
    (((uint32_t)((volatile uint8_t*)params)[7]) <<  8) |
    ((uint32_t)((volatile uint8_t*)params)[8]);
Make sure to repeat this several times! Search for scsi_blk_addr in
usbd_msc_scsi.c until you’ve cast all of them correctly.
Then, at last, the USB device enumerates as MSC correctly, and we can even read and write raw data! However, Windows is not able to format the device.
Now that data can be read and written to, we observe an odd pattern:
WRITE: eb 3c 90 6d 6b 66 73 2e 66 61
READ:  eb 00 90 3c 6b 6d 73 66 66 2e
Every other byte is a bit wrong, or reshuffled. Sounds familiar? Yes, it happens if DDR writes are not aligned to word boundaries, as we experienced before with the SD card, copying it’s data to DDR. (The debugging process that led to that insight is explained in a future article.)
With the write fixed (i.e., done in correctly aligned units of 4 bytes), the device format works, and we can even copy files to the mass storage device, and read them back. The problems is now ... read and write speeds are about 700 kB/s.
As it happens, the USB interface on the custom board has a external, physical 1.5K pullup on the D+ line which signals a Full-Speed device. To switch to High-Speed mode, the device needs to be able to have the pullup present initially, but then switch it off. Indeed, Device Manager shows that the device enumerated as a Full-Speed device, hence the low data rates.
Removing the resistor, the device does not enumerate, or appear at all in the Device Manager. However, we can simply set
hpcd_USB_OTG_HS.Init.speed = PCD_SPEED_FULL;in USBD_LL_Init() function (usbd_conf.c), and then everything works as
before. So something must be wrong with the high-speed mode configuration.
Since removing the 1.5K pullup which was keeping the device in Full-Speed (FS)
mode, the device does not enumerate, neither in DFU mode (with BOOT pins set
to 000), nor using my test firmware (unless I request FS mode directly).
Inserting print statements or debug breakpoints in USB interrupt handler we see
that the USB reset is detected, the device is correctly switched to HS mode
(speed=0), the Rx/Tx FIFOs are large enough, the RXFLVL interrupt is enabled
but it never arrives. The enumeration completes, but the device does not see any
setup or data packets enter the FIFO, and then the device gets suspended,
presumably because it did not reply to the host’s communications. The device
never appears in the Device Manager, or even in USB Device Tree
Viewer.
With BOOT=000, pressing reset causes the PA13 LED to blink, and when the USB
cable is attached, the blinking stops. But looking at the device and USB trees,
nothing happens. Even the STM32_Programmer_CLI -l usb does not see anything:
      -------------------------------------------------------------------
                       STM32CubeProgrammer v2.18.0
      -------------------------------------------------------------------
=====  DFU Interface   =====
No STM32 device in DFU mode connecte